4.29.2015

My Heartfelt Hero

Happy Heartfelt Wednesday everyone! I have another inspiration for you using Heartfelt Creations Everyday Heroes Collection; a collection I love! By adding a few embellishments to one of the panels in the paper collection this card was quick and easy!


You are My Hero Card

Heartfelt Creations Products and Products Carried by HC:

HCDP1-253 Everyday Heroes Paper Collection
HCPC-3664 My Hero Cling Stamp Set
HCPC-3667 You Inspire Me Cling Stamp Set
HCDP1-241 Once Upon a Time Paper Collection
1259723 Art Institute Glue(Dries Clear)
352854 Art Glitter Metal Glue Tip
GBCC811 Clear Cardstock
DDOTS 3D Foam Dots

Other Products Used: Kraft cardstock, Spellbinders Bracket Borders One, rhinestone flourish, chain, Tim Holtz Idea-Ology Metal Corners and Distress Aged Mahogany

Create a 5 1/2” x 5 1/2” top fold card base from kraft cardstock. Trim 1/2” from each side, on front only, to top fold. Use a Spellbinders bracket border die to cut bottom edge of card front. Cut a dark contrast paper, from Everyday Heroes Paper Collection, to 5 1/4” x 5 1/4” and adhere to inside of card. Cut another dark piece of paper to 4 3/8” x 5 1/4”; using the same border die, cut bottom edge and adhere to card front. Stamp, My Hero cling stamp using Distress Aged Mahogany, onto light colored paper, from Everyday Heroes Paper Collection. Trim to  4 1/8” x 5 1/4”, use same border die to cut bottom edge, sponge and add to card front. Stamp “You Inspire Me” onto light colored paper, from Everyday Heroes Paper Collection, trim to 3 1/4” x 4 3/4”, sponge edges and add to inside of card. Fussy cut “Boots” from paper collection, lightly sponge and add to card front with foam pop-ups. Fussy cut corresponding watch from “Once Upon a Time Paper Collection”, add a 1 1/2” clear circle to face of watch and add to card front with foam pop-ups. To finish card add rhinestone flourish to inside of card, glue chain onto card front and add metal corners.

For more inspiration stop by the Heartfelt blog, there your will see some amazing designs from the talented design team.

Until next week, thanks for stopping by,

4.22.2015

My Anchor

Happy Heartfelt Wednesday everyone! Today I have a card featuring one of the large stamps in the Everyday Heroes Collection by Heartfelt Creations. Large stamps are so easy to use, they almost make the card themselves. 
 Heartfelt Creations Products and Products Carried by HC:

HCDP1-253 Everyday Heroes Paper Collection
HCPC-3662 My Anchor Cling Stamp Set
HCD1-761 Everyday Heroes Die
1259723 Art Institute Glue(Dries Clear)
352854 Art Glitter Metal Glue Tip
242174 Vellum Paper

Other Products Used: Zing Charcoal Embossing Powder, Gold Pearls, gold wired ribbon, matte gold cardstock, Spellbinders (Large Ovals & S2-050 Flourishes) and Tim Holtz Idea-Ology compass coin.

Create a side fold 5” x 7” card base. Cut a piece of coordinating paper from Everyday Heroes Paper collection to 4 3/4” x 6 3/4”. Cut an oval in both card base and designer paper, making sure the two ovals will align. Stamp onto vellum using My Anchor cling stamp, with VersaMark ink and use dark gray embossing powder; heat set and trim to 4 1/2” x 6”. Adhere parchment image onto front of card base, centering in oval. Adhere your coordinating paper with oval cut out onto parchment.  Using matte gold card stock, cut anchor, from Everyday Heroes die set, and corner flourishes. Attach to card front as shown. Cut a light colored piece of collection paper to 4 3/4” x 6 3/4” and attach to inside of card. Create a three (3) loop bow from gold ribbon, attach to card and add a metal compass disk. Add a gold pearl to anchor and center of compass. 

Each Wednesday the Heartfelt design team have some amazing designs and inspiration for you, so be sure to stop by the Heartfelt Creations Blog!

Until next week, thanks for stopping by... 

4.15.2015

Special Moments Tag Book

Happy Heartfelt Wednesday everyone! Last Wednesday Heartfelt announced their latest release, the Everyday Heroes Collection! I just love the color pallet in this collection; very vintage and masculine.  I have been wanting to make a mini tag book for quite some time and this collection was just the "push" I needed. I included ribbon and lace from my grandmother's sewing box, copies of vintage ephemera I collect AND a picture of my grand-aunts, Lydia and Sadie!

Mini Tag Remembrance Book

Heartfelt Creations Products and Products Carried by HC:

HCDP1-253 Everyday Heroes Paper Collection
HCPC-3667 You Inspire Me Cling Stamp Set
HCPC-3665 Everyday Hero Newsprint Cling Stamp Set
HCPC-3500 Open Vintage Floret Cling Stamp Set
HCPC-3502 Mini Vintage Floret Cling Stamp Set
HCD1-761 Everyday Hero Die
HCD1-727 Vintage Floret Die
HCD1-736 Classic Leaf Die
HCD1-713 Decorative Lace Border Die
HCST1-401 Deluxe Flower Shaping Kit
1259723 Art Institute Glue(Dries Clear)
352854 Art Glitter Metal Glue Tip
TSMP900 Memento Tuxedo Black Ink
119390136 Gold 3D Stamp-Paint
Other Products Used: #8 Kraft Hang Tags, Spellbinders Fantastic Flourish, Photo Corner Punch, Distress Tea Dye ink, Ribbon, Rhinestone Flourishes, decorative brads and ephemera.
Using a decorative corner punch, cut the lower two corners of each tag. Sponge the edges of your tags front and back. Lay your 4 tags next to each other with an approximate 1/8” between each tag and, using washi tape, attach tags together. Here is a visual for this step:  http://www.oneluckyday.net/2014/08/reminder-to-your-heart.html. Trim tape and repeat on back side. Cut eight (8) pieces 2 3/4” x 6” from the Everyday Heroes Paper Collection, sponge edges and attach to tag book. Stamp, Vintage Floret flowers and Mini Vintage Open, six (6) times using Memento Tuxedo Black ink. Cut out using Vintage Floret Die. Create leaves by using Open Leaf stamp set, stamped onto green paper and cut out with Classic Leaf Die. Color flowers and leaves using Memento ink; add dimension to flowers and leaves using Deluxe Flower Shaping Kit. Create your flowers and set aside. Cut 2 flourishes, 2 photo corners and 1 Lace Border from dark brown paper, lightly highlight with Gold 3D Stamp-Paint. Attach flourishes to tags as shown (if you would like to insert a small picture or tag, only glue the outer edges). Trim Lace Border to fit, apply glue along top, bottom and long side only. On opposite side of mini book add your flower and leaves as shown. Stamp using the round sentiment and phrase from You Inspire Me stamp set; create tags, sponge edges and add to book with decorative brads (prongs removed).  Add rhinestone flourishes where needed. On inside of book add memorabilia and pictures. Thread ribbon through tag holes.
The Heartfelt Design Team have designed beautiful projects, to inspire you and your imagination, using the latest collection! Stop by and see what these amazing ladies have created!
Thanks for stopping by, see you next time...

Cardabilities Sketch Challenge

Have you tried a "Sketch" challenge yet? No...well maybe you should! It's a good way to challenge yourself and just let your design juices go wild!!! Check out the Cardabilities blog for more information and inspiration! Here is the sketch for Challenge #121 and here is my design using that sketch, enjoy!


Start with a 5 1/2" x 5 1/2" top fold card base; add a layer of your chosen paper cut to 5 1/4" x 5 1/2". Cut a contrast paper to 3 1/2" x 5 1/2" and add to center of card base. Cut two Cheery Lynn Ankara Lace Borders, sponge edges, add to card and trim edges. Add a piece of velvet ribbon along one edge of lace; trim to fit card.  Cut leaves and branches using Penny Black Leaves die; add liquid pearls to branch ends and let dry. Cut your circle medallion using Sue Wilsons Italian Collection Decorative Frames, sponge edges and add to card with small foam pop ups. Add your leaves, diy label and finish with a bow sponged to match.

Have fun with this challenge and for all your die cutting needs check out Dies R Us!!

Thanks for stopping by,


April Showers Challenge

Hi everyone! Welcome to the "April Showers Bring May Flowers" challenge at Dies R Us
I created this fun card using Lawn Fawn - Spring Showers Dies and Memory Box - Summer Border die. Unfortunately the Memory Box die is no longer available but a GREAT substitute would be Poppy stamps - Brighton Flower Border Die
I stamped my rain using Impression Obsessions "Rain" background stamp and added to my 6" x 6" card base and stamped Happy Birthday To You (Lawn Fawn Scripty Sayings) at the bottom. Next, I cut the clouds from white card stock and lightly sponged the edges. The sun was cut from a patterned yellow paper and added to the card base along with the clouds, using foam pop ups. My Spring flower border was cut from green patterned paper; I then cut the flower tops and butterflys using different colored paper, cut them out and glued onto the green stems. The border was attached to the card base with foam tape. A few pearls and my card was finished!
Check out the DRU challenge blog, create a project with the theme "April Showers Bring May Flowers", up load your picture and who knows, you might be the next winner! 

Thanks for stopping by,

4.08.2015

Heartfelt Everyday Heroes Collection

Happy Heartfelt Creations Wednesday everyone! Today Heartfelt is presenting their latest release, the Everyday Heroes Collection. 


Do you have an unsung hero in your life?  Your champion may never have a medal pinned to his or her chest, but you can demonstrate your gratitude with the Everyday Heroes Collection from Heartfelt Creations.  These epic stamps, dies and papers salute the extraordinary "ordinary people" who inspire us as they live their daily lives with honor and integrity. Greys, teals, khakis, creams and browns have been blended with distressed newsprint, vintage maps, globes, sailing ships, timepieces, combat boots, stripes, dots and flourishes to create a rugged, paper collection that is timeless in its appeal.  Six deeply etched cling stamp sets featuring detailed collages, inspiring sentiments and unique circular elements mesh perfectly with the paper collection and matching set of dies.  Let's sing the praises of the unsung heroes in our lives with the Everyday Heroes Collection from Heartfelt Creations!

My World is a Better Place

Heartfelt Creations Products and Products Carried by HC:

HCDP1-253 Everyday Heroes Paper Collection
HCPC-3663 My World Cling Stamp Set
HCPC-3666  Everyday Hero Cling Stamp Set
HCPC-3665 Everyday Hero Newsprint Cling Stamp Set
HCD1 761 - Everyday Hero Die
HCPC-3658 Daisy Flourish Cling Stamp Set
HCD1-745 Luggage and Tags Die
HCD1-713 Decorative Lace Border Die
1259723 Art Institute Glue(Dries Clear)
352854 Art Glitter Metal Glue Tip
TSMP800 Memento Rich Cocoa Ink
119390136 Gold 3D Stamp-Paint

Other Products Used: Neenah paper, Spellbinders Gold Elements, Lacy Oval, Small Ovals and Labels 39, Copic markers, VersaMark ink, Zing Embossing powder, Distress inks, foam pop ups, rhinestone flourishes, pearls, robbin and decorative button.
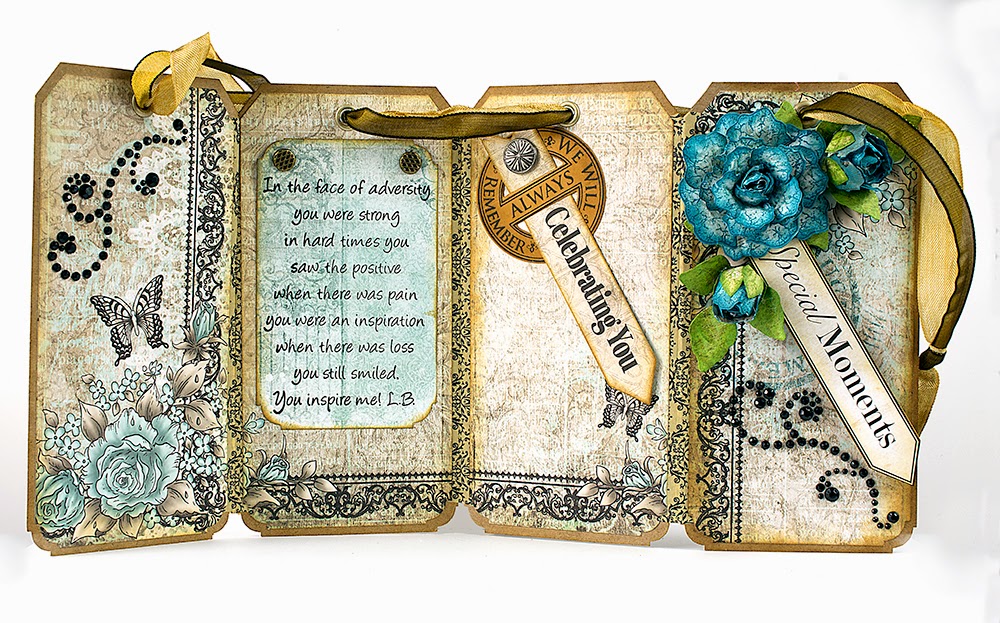
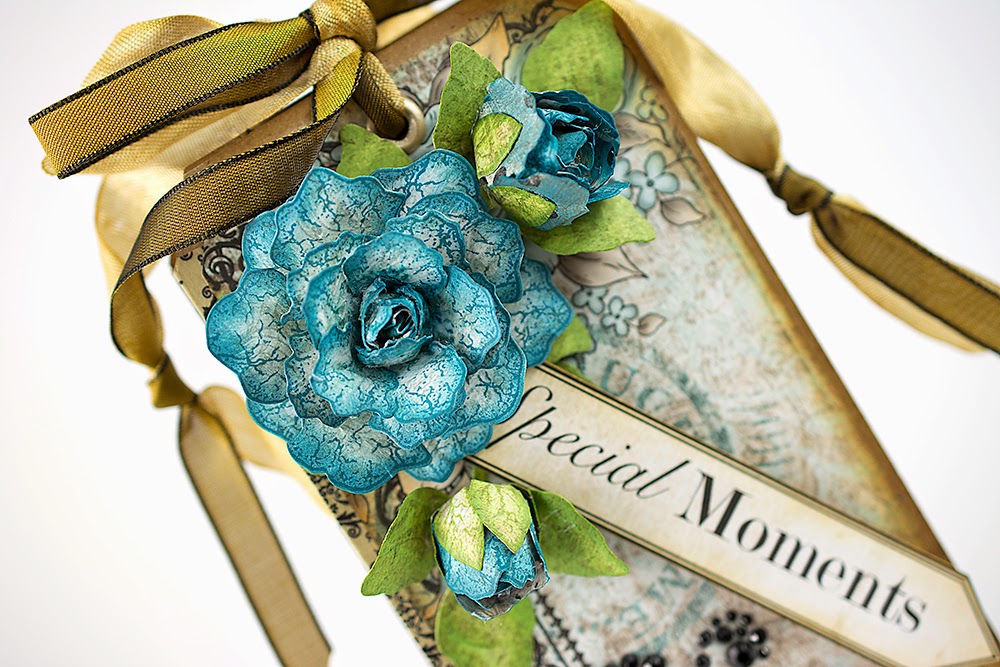
Cut a piece of cream card stock to 9 1/2” x 6”, score at 3 1/2” on the 6” side to create the bottom front flap and sponge all edges with Distress Brushed Corduroy. Using a light colored paper from the Everyday Heroes Paper Collection cut the following: Front of card 1 - 3 1/4” x 5 3/4” and 1 - 3 1/4” x 3”, Inside of card 1 - 3 1/4” x 5”.  Stamp the front panels using the small sprig stamp from the Daisy Flourish set, with Brushed Corduroy and sponge edges. Adhere front lower flap and add metal corners. For the inside, from dark Everyday Heroes Paper,  cut 1 - 5 3/4” x 5 3/4” and 1 - 3 1/4” x 5 3/4”, sponge all edges with Brushed Corduroy; adhere to inside of card. Lower Inside Panel: Using Everyday Hero Cling Stamp Set create a layered medallion, add ribbon through center and add to card. Add a metal corner to the lower left panel, gluing the edges only, to create a pocket for your tags. Make a 2” x 2 3/4” tag from the paper collection, punch decorative corners and sponge edges. Cut 2 printed tags form the paper collection using coordinating dies from the Luggage and Tag set, sponge all edges and add to card along with large tag under the metal corner. Upper Inside Panel: Cut another piece of cream card stock to 3 1/2” x 8 1/2”, score at 3 1/4”  to create the inner flap and sponge all edges with Distress Brushed Corduroy. Stamp the inside (3 1/4” x 5”) panel, that you cut in the beginning, with Every Day Hero Newsprint using Distress Faded Jeans ink and sponge edges with same ink. Attach to lower portion of inner flap. Cut coordinating piece of paper from the collection, cut at 3 1/4” x 3”, sponge edges and add to upper flap. Add this flap to the top portion, making sure the folded edge is on top. Using a gold/tan card stock cut two (2) Decorative Lace Borders, cut apart to fit card and lightly sponge using Gold 3D Stamp-Paint. Add to each side of center panel. Cut four (4) corners using brown card stock and Spellbinders Gold Elements, sponge with Gold 3D Stamp-Paint and add to each corner. From brown card stock cut a Spellbinders Lacy Oval and lightly sponge with Gold 3D Stamp-Paint; cut an old photograph (please use a copy), using Spellbinders Small Ovals, add to brown oval and add to card as shown.
 
Front of Card: Stamp, using My World Cling Stamp Set, onto gold/tan card stock with VersaMark ink and Zing Brown Sugar embossing powder; heat set. Cut out using Spellbinders Labels 39. Using the same stamp and Memento Rich Cocoa Ink stamp the globe onto cream card stock; color with Copic BG11 and E41. Using the globe die from the Everyday Hero Die set cut out the stand and add globe. Attach large label to fold over flap and add globe with foam pop ups. Make a four loop bow, add to card and attach a decorative button to center. Add a Spellbinders Corners and Accents die cut to center of lower panel. Finish inside with rhinestone flourishes and pearls.
I'm sure you agree, this is an amazing collection full of possibilities! The Heartfelt Design Team have really gone all out to inspire you, so be sure to check out all their designs at the Heartfelt blog!

More designs and inspiration next week, thanks for stopping by,

4.01.2015

You Brighten My World...

Happy Heartfelt Creations Wednesday everyone! I have a great card for you today, it's a diagonal opening card! I love cards that open a little differently than most "store bought" and when I saw this tutorial, from Holly at Ribbons and Glue, I knew I had to make one. I changed the size of the card to a 6" x 6" but you could adapt this technique for any size card. Using the latest release from Heartfelt, the Peacock Paisley Collection, made this card go together easily. It's all there for you, everything coordinates, stamps, dies and paper!

You Brighten my World Card
Heartfelt Creations Products and Products Carried by HC: HCDP1-252 Peacock Paisley Paper Collection HCPC 3656 Delightful Daisies Cling Stamp Set HCD1-760 Delightful Daisy Die HCPC-3657 Feathered Daisy Cling Stamp Set HCPC-3661Feathery Peacock Cling Stamp Set HCD2-752 Cut Mat Create 2B Die HCD1-745 Luggage and Tags Die TSMP704 Memento New Sprout HCST1-401 Deluxe Flower Shaping Kit Art Glitter Dries Clear Adhesive Art Glitter Metal Glue Tip Other Products Used: Neenah paper, VersaMark Ink, white embossing powder, Stampendous Ultra Fine Glitter, Recollections Clear Rhinestone Stickers, Copic Y36, Recollections Mini Flower Punch, 3M foam tape, ribbon, lace and foam pop ups.
Project Instructions: Cut a 12” x 12” sheet of white cardstock in half to create two (2) pieces at 6” x 12”, score at 6” on both pieces. Attach pieces together to create a 6” x 18” strip of cardstock. The center of your card base will be double thick. Fold the left and right side panels as shown in this tutorial by Holly at Ribbons and Glue: http://www.ribbonsandglue.com/2012/01/paper-varietymulti-fold-card-tutorial.html. Glue your triangles together to create a diagonally opening card. Stamp your flowers onto white cardstock, twice (2x) , with Delightful Daisies Cling Stamp using Memento New Sprout ink. Stamp three leaves onto green paper from the Peacock Paisley Paper Collection using Memento New Sprout ink. Cut out flowers and leaves using the Delightful Daisy Die, shape flowers with the Deluxe Flower Shaping Kit, add glue to petals, sprinkle with glitter and let dry. Double stack the larger flowers and glue together; let dry. Cut two (2) pieces of coordinating paper, from the Peacock Paisley Paper Collection, to 5 3/4” x 5 3/4” and cut on the diagonal. Using VersaMark ink stamp images from Feathered Daisy and Feathery Peacock cling stamp set onto the triangles you will be using on the inside of your card, sprinkle with white embossing powder and heat set. Attach triangles to the left and right inside panels. Cut a 6” x 6” panel from the Peacock Paisley Paper Collection; trim the panel to 5 3/4” x 5 3/4”, add your sentiment and adhere to center inside panel of card base. Attach the triangles you are using for the front of your card to the card base. Cut the leafy flourish, from the Cut Mat Create die set, using paper from the Peacock Paisley Paper Collection and attach to right side of card base. Cut a tag using the coordinating die from the 
Luggage and Tags Die set; cut a sentiment from the paper collection and attach to tag. Add lace along left and bottom edges. Make a three loop bow from green ribbon, add to upper left corner of card; arrange leaves and flowers. Color clear rhinestones using Copic Y38 and add to centers of daisies. Punch several white mini flowers, lightly sponge edges of petals with New Sprout ink and add small rhinestones to centers. Add to card front along with your tag. Add rhinestones to inside of card.
I hope you give this card design a try! It was a lot of fun to make. The Heartfelt Creations Design Team have some great inspiration for you every week; be sure to stop by the HC Blog and check out all the projects!

Thanks for stopping by,