5.27.2015

Heartfelt Golden Fuchsias

Happy Heartfelt Wednesday everyone! I you had a great Memorial weekend with family and friends! I had two days of not getting up to an alarm clock; that was such a treat. My inspiration for the week, using the Cascading Fuchsia Collection, is a golden anniversary card.
This is a side hinged card and was not as complicated as it might look.
The detail in the Cascading Fuchsia stamps is amazing!
Here is the inside of my card, ready for a sentiment and then off to the recipient!
For complete instructions for this card and all the Heartfelt design team's projects please visit the Heartfelt Blog. The blog also has many tutorials that give you step by step directions for creating the beautiful flowers and elements from Heartfelt's collections.

5.20.2015

Cascading Fuchsia Frame

Happy Heartfelt Wednesday everyone! It is actually raining today, yup...rain! Who knew, haven't seen it too often around here but it is much needed and such a nice change from sunny, sunny, sunny! My inspiration for today is a small frame accented with flowers from Heartfelt Creations latest release, Cascading Fuchsias Collection! The colors are gorgeous and the stamps are so detailed!

Please visit the Heartfelt Blog for more inspiration from the Heartfelt Design Team!


Cascading Fuchsia Frame

Heartfelt Creations Products and Products Carried by HC:

HCPC-3668 Cascading Fuchsia Cling Stamp Set
HCD1-763 Cascading Fuchsia Die
HCPC-3532 Beautiful You Cling Stamp Set
HCD-732 Decorative Flower Pot die
TSMP400 Memento Rose Bud Ink
TSMP707 Memento Cottage Ivy Ink
HCPC-3672 Deluxe Flower Shaping Kit
1259723 Art Institute Glue(Dries Clear)
352854 Art Glitter Metal Glue Tip
359848 Spellbinders Tool N' One

Other Products Used: Neenah white cardstock, Lasting Impressions paper, glitter, ribbon, paper twine, heart charm, clear dewdrops and purchased frame.

Project Instructions: Using two side paper (white on one side magenta on the other) stamp Cascading Fuchsias several times on the white side with Memento Rose Bud ink. Stamp fuchsia stamens onto green paper. Cut out fuchsias and stamens using Cascading Fuchsia Die, color with Memento inks and shape using the Deluxe Flower Shaping Kit. Add glitter to stamen tips, let dry and shape.
Assemble the fuchsias using a glue gun.  Stamp leaf swirl from the Beautiful You stamp set onto light green cardstock, cut out using die from the Decorative Flower Pot die set, color with Memento ink and shape. Create a four loop ribbon bow and a paper twine bow; add to frame with a glue gun. Arrange leaves and fuchsias. Add dew drops to leaves and place a metal heart charm into the arrangement.


5.15.2015

Dies R Us First Anniversary!

It's hard to believe DRU is celebrating it's First Anniversary! Where did the year go? So many dies and so little time, lol. Congratulations to Dies R Us and here is my anniversary card to celebrate this event!

The dies I used are: Memory Box Lunette ButterflyMemory Box Oriel ButterflyMemory Box Vivienne ButterflyMemory Box Darla Butterfly,  Memory Box Floating Butterfly Frame and Spellbinders Sprigs.


This month the DRU Challenge Blog theme is "Anniversary Cards"! To find out more go HERE and see all the inspiration from the design team; plus information on how you could be an anniversary winner!


5.13.2015

Heartfelt Cascading Fuchsias

Happy Heartfelt Wednesday everyone! Well, here it is, Heartfelt Creations newest release, Cascading Fuchsia Collection. I had so much fun creating with this release, but then again I do with all their releases!

Heartfelt Creations invites you to join us for a stroll through a quaint cottage garden where your cares will melt away and your creative energy will be refreshed and renewed.  The Cascading Fuchsia Collection of stamps, dies and papers is bursting with lush greenery and exquisite beauty.  Here, you'll find pendant shaped clusters of show-stopping pink, purple and magenta blossoms that are also called "Angel's Earrings."  Graceful vines, lacy patterns, flitting butterflies, shady bowers and delicate latticework come together and form this restful haven.  It's a celebration of the simple things that fill this moment in time with wonder and spontaneous joy.  Cascading Fuchsia: It's a flawless garden of peerless delight and a creative sanctuary for the artist in you.


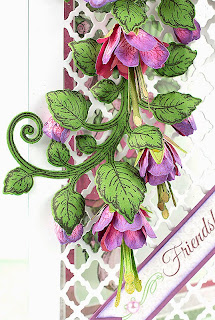
Cascading Fuchsia Lattice Card

Heartfelt Creations Products and Products Carried by HC:

HCDP1-254 Cascading Fuchsia Paper Collection
HCPC-3668 Cascading Fuchsia Cling Stamp Set
HCD1-763 Cascading Fuchsia Die
HCPC-3650 Butterfly Medley Cling Stamp Set
HCD1-758  Botanical Wings Die
HCPC-3546 Classic Leaf Cling Stamp Set
HCD-736 Classic Leaf Die
TSMP400 Memento Rose Bud Ink
TSMP707 Memento Cottage Ivy Ink
TSMP900 Memento Tuxedo Black
HCPC-3672 Deluxe Flower Shaping Kit
1259723 Art Institute Glue(Dries Clear)
352854 Art Glitter Metal Glue Tip
GBCC811 Clear Cardstock
359848 Spellbinders Tool N' One

Other Products Used: Neenah white cardstock, Lasting Impressions paper, Wink of Stella (clear) and pearls.
Project Instructions: Make a 5” x 7” side fold card base using Heartfelt Creations clear cardstock. Cut a piece of white cardstock to 5” x 7”, die cut the lattice using Spellbinders die and attach to card front. Cut a 5” x 7” printed panel from Fuchsia Paper Collection and attach to inside of card. Using two side paper (white on one side magenta on the other) stamp Cascading Fuchsias several times, on the white side, with Memento Rose Bud ink. Stamp fuchsia stamens onto green paper. Cut out fuchsias and stamens using Cascading Fuchsia Die, color with Memento inks and shape using the Deluxe Flower Shaping Kit. Add glitter to stamen tips, let dry and shape. Assemble the fuchsias using a glue gun. Stamp two (2) Classic Leaf Open swirls onto green cardstock, cut out with coordinating Classic Leaf die, color and shape. Attach leafy swirls and Fuchsias to front of card. Stamp a butterfly from the Butterfly Medley Collection onto white cardstock; cut out using coordinating Butterfly medley die, color, shape and add to card. Create a tag using a printed sentiment from the Cascading Fuchsia Paper Collection, sponge edges, layer onto a coordinating piece of cardstock, attach pearls and add to card front. Add clear Wink of Stella and a small pearl to butterfly to finish card.


The Heartfelt Creations shop has this collection ready for you! Don't wait, I'm sure it will sell out fast! The HC design team have really out done themselves, check out the HC blog for inspiration and ideas!

5.06.2015

Heartfelt Little Angel

Happy Heartfelt Wednesday everyone! My inspiration for the week is a sweet baby card! I just love how many of the stamps, dies and papers from Heartfelt can be used together!
Heartfelt Creations Products and Products Carried by HC:
HCPC 3656 Delightful Daisies Cling Stamp Set
HCD1-760 Delightful Daisy Die
HCD1-761 Everyday Heroes Die
HCD1-713 Decorative Lace Border Die
HCPC-3605 Sweet Lullaby Sentiments Cling Stamp Set
HCD1-744 Once Upon a Time Die
HCDP1-243 Sweet Lullaby Paper Collection
HCPC-3672 Deluxe Flower Shaping Kit
101  Baby's Breath Ultrafine Transparent Glitter
1259723 Art Institute Glue(Dries Clear)
352854 Art Glitter Metal Glue Tip

Other Products Used: Neenah white cardstock, Spellbinders Shapeabilities Sprigs, Distress ink, Glossy Accents, Clear Embossing powder, VersaMark ink, 3M foam tape, ribbon and pearls.

Create an A2, 4 1/4” x 5 1/2” white card base. Cut a piece 4” x 5 1/4” from the Sweet Lullaby Paper Collection, attach to card base with foam tape. Use the Decorative Lace Border Die to cut a contrast strip, trim to fit card front and glue in place along right edge. Using the Delightful Daisies Cling Stamp Set, Delightful Daisy Die and Deluxe Flower Shaping Kit create your flowers. Using Glossy Accents coat each petal and sprinkle with Baby’s Breath Ultrafine Transparent Glitter; allow to dry. Cut a white frame using the Everyday Heroes Die and lightly sponge with distress ink. Cut a contrast circle and attach to frame. Stamp (2x), Little Angel, using Sweet Lullaby Sentiments Cling Stamp Set, cut out using coordinating Once Upon a Time Die and add to frame center. Cover the second stamped image with VersaMark ink and heat emboss using clear embossing powder; cut out and add to frame. Attach frame to card front with foam tape. Cut sprigs using a coordinating green paper. Add pearls to center of flowers and frame. Make a three loop bow, attach to card with hot glue, add flowers and greenery.

Thanks for stopping by today and beside to come back next for the next beautiful release, Cascading Fuchsias! Check out the Heartfelt Blog for more inspiration!

Until next time, thanks for stopping by,